Calling Dialogs with an Interface
You can define an interface for a visualization which is called as a dialog.
To do this, create a visualization as visualization type Dialog and declare an interface for the dialog. Then reference the visualization in a primary visualization by means of user input and pass the parameters to the interface.
When you call the visualization as an integrated visualization, the parameters which are passed must be variables of a basic data type. If the visualization is called as a CODESYS TargetVisu or a CODESYS WebVisu, then the parameters can have custom data types as well.
Main procedure
Set the visualization types of the visualization to dialog.
Declare variables in the interface editor of the dialog.
The dialog has an interface. You can pass parameters when calling the dialog.
Configure the elements of the dialog and use the interface variables.
Select an element in another visualization (usually the main visualization) for configuring how the dialog opens.
In the property, click Configure.
The Input configuration dialog opens.
In the list of selected input actions, select Open dialog.
In the Dialog list box, select a dialog.
If the selected dialog has an interface, then the interface variables are listed below the list.
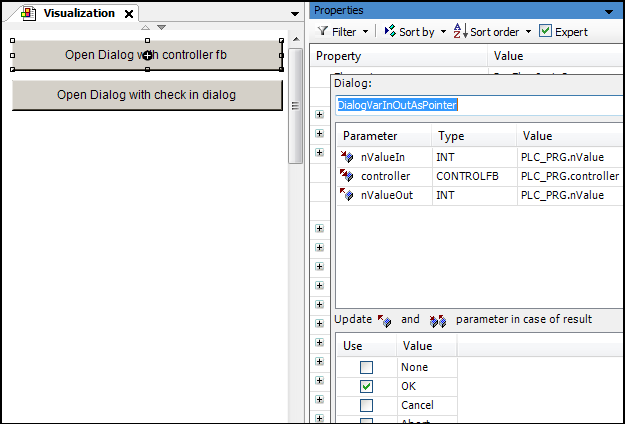
Assign a transfer parameter to the interface variables in the Value column.
In the Update
 and
and  parameter in case of result list, select the result for which the parameters should be updated.
Select the Open dialog modal option. Click OK to close the dialog.
The dialog opening is configured.
Tip
Executing a dialog several times at the same time requires multiple instances of the dialog. These already need to have been downloaded to the visualization device when downloading the application. To do this, in the Visualization Manager (Visualizations tab) set the number of instances to download.
Note
 Sample project: Dialog Box
Example
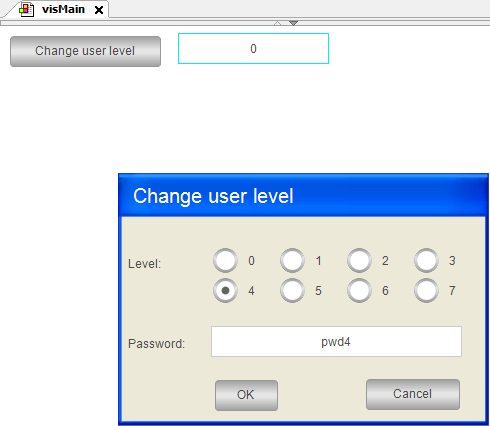
Below you will find an example of the implementation of the visMain visualization and the visChangeUserLevel dialog.
visMain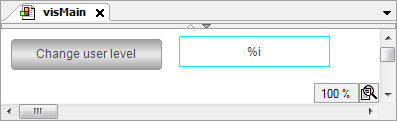
visMain visualizationType | Name | Element properties | Description |
|---|---|---|---|
| User level | : | Output with placeholder |
: | Assignment of the | ||
|
| : | |
: | When a user clicks the Hint: Click Configure to view the stored configuration in the Input configuration dialog → Open dialog input action. |
The Open dialog input action is implemented for the "Change user level" button. As a result, a dialog opens (OnMouseClick)).
Dialog |
The list box automatically provides all project-wide visualizations which have been configured as dialogs. |
|
|
| Passing of a string for the title. |
|
|
| Passing of a string as password for Level0. |
|
|
| Passing of a string as password for Level1. |
|
|
| Passing of a string as password for Level2. |
|
|
| Passing of a string as password for Level3. |
|
|
| Passing of a string as password for Level4. |
|
|
| Passing of a string as password for Level5. |
|
|
| Passing of a string as password for Level6. |
|
|
| Passing of a string as password for Level7. |
|
|
| Passing of a variable for the level specified by the user. |
|
|
| Passing of a variable for the password. |
 and
and  parameter in case of result"
Use | Value | |
|---|---|---|
| OK | When the visualization user clicks the button, the dialog opens and the result "OK" is returned. |

| Enabled as a result, inputs outside of the dialog are not possible. |
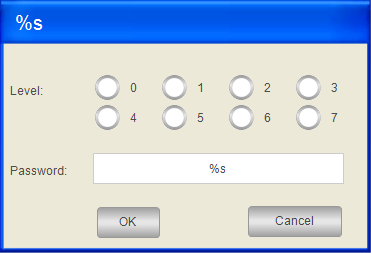
visChangeUserLevelThe dialog provides elements for selecting the level and entering the password.
If the password matches, then the OK button is enabled. Then the user can close the dialog. The input of the level is also applied.
Declaration of the interface of dialog visChangeUserLevel:
VAR_INPUT
    sItfTitle: STRING; // titel of the dialog box
    sItfLevel0: STRING; //password level 0
    sItfLevel1: STRING; //password level 1
    sItfLevel2: STRING; //password level 2
    sItfLevel3: STRING; //password level 3
    sItfLevel4: STRING; //password level 4
    sItfLevel5: STRING; //password level 5
    sItfLevel6: STRING; //password level 6
    sItfLevel7: STRING; //password level 7
END_VAR
VAR_IN_OUT
    iItfLevel: INT; // user input: level
    sItfPwd: STRING; //user input: password
END_VAR Type | Name | Element properties | Description |
|---|---|---|---|
|
| Static ID: | The property assigns the image of a blank dialog with a gray background and a blank blue title bar to the element. The image is included in the VisuDialogs library. |
|
| : | Output with placeholder for text variable |
: | Assignment of interface variable | ||
|
| Variable: | Assignment of interface variable |
Number of columns: | |||
Radio button order: Left to right | Appearance | ||
: [0] bis [7] : <n> | Label of eight radio buttons with numbers from 0 to 7 | ||
|
| : | Output with placeholder for text variable |
: | Assignment of interface variable | ||
: | In the Input configuration dialog, Text input is selected for the Input type list box and the option Use text output variable is activated. | ||
|
| : | Label |
|
| : | Label |
|
| : | Label |
: : | Configuration of the display in state-dependent colors. You can switch between colors. | ||
: | If the password and the user input do not match, then the expression is | ||
: | If the password and the user input do not match, then the expression is If the password matches, then the button is enabled. | ||
: | When a user clicks the OK button, the | ||
|
| : | Label |
: | Appearance | ||
: | When a user clicks the Cancel button, the |
and parameter in case of result"
| OK | When the visualization user clicks the button, the dialog opens and the result "OK" is returned. |
and parameter in case of result"
| Cancel | When the visualization user clicks the button, the dialog opens and the result "Cancel" is returned. |
PLC_PRG:PROGRAM PLC_PRG
VAR
iLevel: INT;
sPwd : STRING;
END_VAR 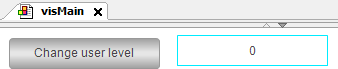
After clicking the button, the dialog opens and permits inputs. If the specified text matches the stored text, then OK is enabled:
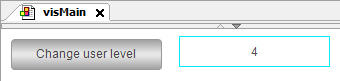
After clicking OK, the selection is applied.
Tip
The example shows the procedure for multiple return values. However, the password can be returned more easily with a local variable in the dialog.
Accessing parameters programmatically
The variables declared in the interface of a visualization are available automatically as structure variables. They are identified by <name of visualization>_VISU_STRUCT. Therefore, you can access the interface variables of visualizations that appear as a dialog. Normally you use the structure in the application code of a function that is called by a user input.
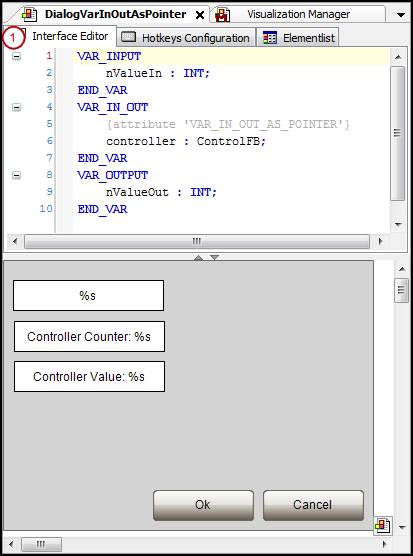
Passing of pointers as parameters
To pass a complex data structure, you can flag an interface variable of type VAR_IN_OUT with the pragma attribute VAR_IN_OUT_AS_POINTER and pass a pointer or reference to it as a parameter.
Declare the user data object (
DUT).In the interface editor of a dialog, declare an interface variable (
VAR_IN_OUT) as a reference to the data object by assigning the attribute'VAR_IN_OUT_AS_POINTER'to the variable.Program the user interface: use the dialog in a visualization or assign the dialog in the input configuration of a visualization element. Then access to the referenced data is possible.
FUNCTION_BLOCK ControlFB
VAR_INPUT
END_VAR
VAR_OUTPUT
END_VAR
VAR
    bOk : BOOL := TRUE;
    nCounter : INT;
    nValue : INT;
END_VAR
nCounter := nCounter + 1;
Declaration of an interface variable with VAR_IN_OUT_AS_POINTER
User interface: Dialog opens: